Starbucks Copycat Pumpkin Scones: Even Better At Home
As autumn leaves begin to fall and the air turns crisp, a certain craving awakens in many of us: the warm, comforting embrace of pumpkin spice. For years, Starbucks’ pumpkin scones have been a quintessential part of this seasonal indulgence, beckoning countless fans to their local coffee shops. Known for their tender texture and signature double glaze, these pastries held a special place in the hearts (and bellies) of fall fanatics. However, recent changes at Starbucks have left many longing for this beloved treat, making the quest for a perfect
homemade pumpkin scones Starbucks recipe more important than ever.
But what if we told you that not only could you recreate this autumn staple in your own kitchen, but you could actually make them *even better*? Imagine perfectly soft, wonderfully moist, and impeccably spiced scones, fresh from your oven, still warm, and adorned with that iconic dual glaze. This isn't just about replacing a discontinued item; it's about elevating the experience, offering a superior taste, and enjoying the undeniable satisfaction of baking something truly special from scratch. Get ready to transform your kitchen into your personal fall bakery, because this copycat recipe promises to deliver the ultimate pumpkin scone experience, right at your fingertips.
Why Your Own Homemade Pumpkin Scones Are the Ultimate Fall Treat
The allure of Starbucks' seasonal offerings is undeniable, but there's a unique magic that comes with crafting your favorite treats at home. When it comes to a
homemade pumpkin scones Starbucks recipe, the advantages are plentiful and deeply satisfying.
Firstly, let's address the elephant in the room: Starbucks' recent decision not to bring back their pumpkin scones for the fall season left many fans disappointed. This change, while perhaps temporary, highlighted the vulnerability of relying on commercial establishments for our seasonal cravings. By mastering your own recipe, you gain control, ensuring that your pumpkin scone fix is always just an oven away, regardless of corporate decisions.
Beyond availability, the cost savings are substantial. A daily Starbucks scone habit can quickly add up, especially when paired with a pumpkin spice latte. Making a batch at home yields multiple servings for a fraction of the price, allowing you to indulge more frequently without breaking the bank.
Furthermore, making your own scones offers unparalleled control over ingredients. You choose the freshest butter, the finest spices, and the purest pumpkin puree, free from any unwanted additives or preservatives. This often translates to a pastry with a superior flavor profile and texture – one that's fluffier, moister, and perfectly balanced in sweetness and spice. You can adjust the intensity of the pumpkin spice, the richness of the glazes, or even incorporate organic ingredients, tailoring the experience precisely to your preferences. The joy of pulling a tray of golden-brown, fragrant pumpkin scones from your own oven, knowing every ingredient that went into them, is a reward in itself.
Unveiling the Secrets to Perfectly Fluffy Homemade Pumpkin Scones
Achieving that ideal scone texture – light, fluffy, and tender – is a craft, and it starts with understanding a few fundamental principles. This
homemade pumpkin scones Starbucks recipe focuses on techniques that guarantee success every time.
The Magic of Cold Butter
Perhaps the most crucial element in any scone recipe is *cold butter*. Just like in flaky pie crusts, cold butter is essential for creating those delightful pockets of air that give scones their signature texture. When tiny pieces of cold butter are worked into the flour, they melt in the hot oven, releasing steam and creating layers. If the butter is too warm, it will fully incorporate into the dough, leading to a denser, tougher scone.
To incorporate the butter effectively, cut it into small cubes and quickly rub it into the dry ingredients using your fingertips until the mixture resembles coarse breadcrumbs. The key is speed – you want to minimize handling to prevent the butter from warming up too much. For those who prefer tools, a pastry cutter or even a food processor (pulsed briefly) can also achieve this desired consistency. The goal is small, pea-sized pieces of butter distributed throughout the flour.
Don't Overmix! The Golden Rule of Scone Making
Once your wet ingredients (pumpkin puree, egg, milk) are combined with the dry ingredients, resist the urge to vigorously mix the dough. Overmixing develops the gluten in the flour, which results in tough, chewy scones rather than the tender, crumbly texture we crave.
Instead, mix just until the ingredients are *just combined* and a shaggy dough begins to form. It’s perfectly normal for the dough to be a little sticky and rustic-looking. A few streaks of flour are acceptable. This gentle approach ensures the gluten remains relaxed, allowing your scones to rise beautifully and maintain their light, airy structure.
Shaping and Baking for Success
With the dough gently prepared, turn it out onto a lightly floured surface. Briefly work it into a cohesive ball using lightly floured hands, then gently flatten it into an 8-inch disc. Using a sharp knife, cut the disc into 8 even triangles. Don't worry if the dough feels a bit sticky; that's a good sign of a moist scone!
Carefully transfer the triangles to a parchment-lined baking sheet, ensuring some space between each scone. Brushing the tops with a little milk before baking encourages a beautiful golden-brown crust. Preheat your oven to a robust 400ºF (200ºC) – the high initial heat helps the scones rise quickly. Bake for approximately 15 minutes, or until they're lightly golden. Transfer them to a wire rack to cool slightly before the grand finale: the glazes.
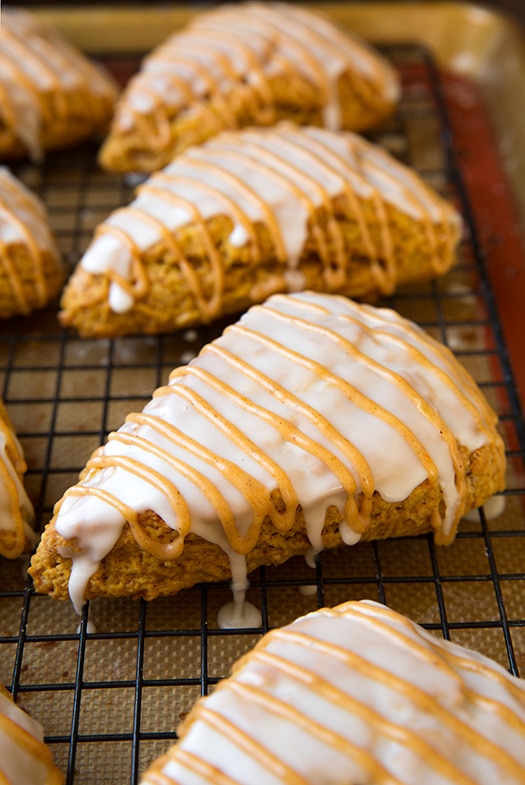
The Signature Double Glaze: A Sweet Symphony of Flavor
What truly sets Starbucks’ pumpkin scones apart is their distinctive dual glaze – a creamy white base topped with a spiced pumpkin drizzle. This combination not only adds visual appeal but also layers on sweetness and extra pumpkin spice flavor, making each bite an experience.
The Classic White Glaze
The first layer is a simple yet essential white glaze. It’s a foundational sweetness that complements the pumpkin flavor without overpowering it. To make it, combine powdered sugar with a small amount of milk. The secret here is to add the milk *slowly*, a teaspoon at a time, whisking vigorously until you achieve a thick, pourable consistency. You want it to coat the back of a spoon and drip slowly, not run off too quickly. Once the scones have cooled for about 10 minutes, spoon an even layer of this white glaze over the top of each, allowing it a few minutes to set before moving on to the next step.
The Spiced Pumpkin Drizzle
This is where the pumpkin party truly comes alive! The second glaze incorporates pumpkin puree and extra pumpkin spice, intensifying the autumnal notes. Similar to the white glaze, you'll combine powdered sugar, pumpkin puree, and pumpkin spice, then gradually add milk until you reach that perfect thick, drippable consistency.
For that iconic Starbucks look, transfer the spiced pumpkin glaze to a piping bag (or a small Ziploc bag with a tiny corner snipped off). Drizzle it decoratively over each white-glazed scone, creating a beautiful pattern. Allow both glazes ample time to set – this ensures they harden slightly and don't smudge when handled. The result is a scone that looks as professional as it tastes, with every stripe hinting at the deliciousness within.
Beyond the Basics: Expert Tips for Your Homemade Pumpkin Scones
Mastering the
homemade pumpkin scones Starbucks recipe is just the beginning. A few expert tips and insights can elevate your baking even further, ensuring consistent success and offering room for personalization.
Ingredient Deep Dive & Variations
*
Pumpkin Puree vs. Pumpkin Pie Filling: Always use 100% pure pumpkin puree, not pumpkin pie filling, which is pre-spiced and sweetened. The goal is to control the flavors precisely in your scone.
*
Homemade Pumpkin Spice: If you don't have a pre-made pumpkin spice blend, you can easily create your own with a mix of cinnamon, nutmeg, ginger, and cloves. This allows for customized spice levels.
*
Adding Extra Texture: While the original Starbucks scones are plain, you could experiment with a handful of mini chocolate chips or finely chopped pecans mixed into the dough for an added layer of flavor and texture. Just remember that less is often more with scones!
Freezing for Future Enjoyment
Scones are wonderfully freezer-friendly, allowing you to prepare ahead or enjoy fresh-baked treats on demand.
*
Freezing Unbaked Dough: After cutting the scone triangles, arrange them on a baking sheet and freeze until solid (about 1-2 hours). Once frozen, transfer them to an airtight freezer bag or container. When ready to bake, place frozen scones directly on a parchment-lined baking sheet and bake as directed, adding a few extra minutes to the baking time.
*
Freezing Baked Scones: Bake and cool the scones completely without glazing. Wrap them individually in plastic wrap, then place them in a freezer-safe bag. Thaw at room temperature or warm briefly in the oven before glazing.
Perfect Pairings & Serving Suggestions
These homemade pumpkin scones are incredibly versatile. They are, of course, the ultimate companion to a hot cup of coffee or your favorite tea, making them perfect for breakfast or an afternoon pick-me-up. For a truly decadent experience, serve them alongside a dollop of whipped cream or a scoop of vanilla bean ice cream for a dessert that screams fall.
If you're looking for an even simpler approach or want to master the basics, check out our guide on
Easy Starbucks Pumpkin Scone Recipe: Your Fall Must-Bake. For those who genuinely miss the original, this recipe is a perfect substitute, and you can find more inspiration on how to
Miss Starbucks Pumpkin Scones? Make This Fluffy Copycat!
Troubleshooting Common Scone Issues
*
Tough Scones: Almost always due to overmixing the dough or using warm butter. Remember: gentle handling and cold butter are your allies!
*
Flat Scones: Could be old or inactive baking powder, or the butter was too warm before baking, causing it to melt out rather than create steam.
*
Dry Scones: Too much flour, or not enough liquid (pumpkin puree/milk). Accurately measure ingredients, especially flour, and ensure your pumpkin puree isn't overly dry.
Embrace the process, learn from each batch, and soon you'll be a scone-making maestro, delighting everyone with your superior homemade creations.
There’s a unique joy in recreating a beloved classic in your own kitchen, especially when the result surpasses the original. This
homemade pumpkin scones Starbucks recipe offers not just a replacement for a seasonal favorite, but an upgrade. By understanding the simple science behind flaky pastries and mastering the art of the double glaze, you unlock a world of comforting autumn flavors. So, this fall, skip the coffee shop queue and embark on a rewarding baking journey. Your kitchen will be filled with the intoxicating aroma of pumpkin spice, and your taste buds will thank you for these truly exceptional, better-than-Starbucks pumpkin scones. Happy baking!